
按『个人 Wiki』风格整理的学习笔记
wiki.openfoam.comopenfoam.com首次下载:
git clone https://develop.openfoam.com/Development/openfoam.git
cd openfoam
git submodule init
后续更新:
git pull
git submodule update
sudo apt update
sudo apt install build-essential autoconf autotools-dev cmake gawk gnuplot
sudo apt install flex libfl-dev libreadline-dev zlib1g-dev openmpi-bin libopenmpi-dev mpi-default-bin mpi-default-dev
sudo apt install libgmp-dev libmpfr-dev libmpc-dev
sudo apt install libscotch-dev libptscotch-dev libfftw3-dev libboost-system-dev libboost-thread-dev libcgal-dev
⚠️ 用上述方法安装 Open MPI 后,应当可以执行以下命令:
orterun --version 应返回 Open MPI 的版本号。mpicc --show 应返回编译命令,OpenFOAM 将用它完成编译、链接。以上第三方库也可以手动安装(参见 scotch),好处是安装路径可控、易在机群内共享。
加载默认配置:
source <source_dir>/etc/bashrc # 首次运行后,会设置 WM_PROJECT_DIR=<source_dir>
如果出现以下错误:
gcc: error: unrecognized command-line option '--showme:link'
或者要修改部分选项,可以在 source $WM_PROJECT_DIR/etc/bashrc 后面追加 (append) 所要修改的选项(详见 $WM_PROJECT_DIR/etc/bashrc 中的注释),常用的有:
WM_PROJECT_USER_DIR=<user_dir>】将默认的 /home/<user>/OpenFOAM/<user>-<version> 替换为用户指定的 <user_dir>。WM_MPLIB=USERMPI】用本地搭建的 MPI 环境替换系统自带的 Open MPI。根据 $WM_PROJECT_DIR/etc/config.sh/mpi 中的注释,用户需要在加载此项前设置好 $WM_PROJECT_DIR/wmake/rules/General/mplibUSERMPI 文件。示例:
foam  # 即 cd $WM_PROJECT_DIR
# 设置 USERMPI 的环境变量:
USERMPI_INSTALL=<usermpi_install>  # 指向 USERMPI 的安装目录
PATH=$USERMPI_INSTALL/bin:$PATH    # 指向 USERMPI 的 bin 目录
export PATH
# 设置 mplibUSERMPI 文件:
echo "PINC  = -I$USERMPI_INSTALL/include"    > wmake/rules/General/mplibUSERMPI
echo "PLIBS = -L$USERMPI_INSTALL/lib -lmpi" >> wmake/rules/General/mplibUSERMPI
# 加载修改过的配置:
source etc/bashrc WM_MPLIB=USERMPI WM_PROJECT_USER_DIR=$WM_PROJECT_DIR/../$WM_PROJECT_VERSION
为了在每次打开 shell 前自动设置环境变量,建议在 ~/.bashrc 或 ~/.zshrc 中加入以下命令:
PATH=$HOME/shared/mpich/install/bin:$PATH
export PATH
LD_LIBRARY_PATH=$HOME/shared/mpich/install/lib:$LD_LIBRARY_PATH
export LD_LIBRARY_PATH
source $HOME/shared/openfoam.com/source/etc/bashrc WM_MPLIB=USERMPI
source $WM_PROJECT_DIR/etc/bashrc WM_MPLIB=USERMPI WM_PROJECT_USER_DIR=$WM_PROJECT_DIR/../$WM_PROJECT_VERSION
该示例假设:
$HOME/shared/mpich/install/ 为 MPICH 的安装目录(含 bin、include、lib、share 四个标准子目录)。$HOME/shared/openfoam.com/source/ 为 OpenFOAM 的源代码目录。系统检查:
foamSystemCheck
应当返回:
Checking basic system...
-------------------------------------------------------------------------------
Shell:       zsh
[The zsh shell is generally okay to use]
Host:        host1
OS:          Linux version 5.11.0-18-generic
User:        common

System check: PASS
==================
Can continue to OpenFOAM installation.
编译 OpenFOAM:
./Allwmake -j -s -q  # compiles with all cores (-j), reduced output (-s, -silent), with queuing (-q, -queue)
foamInstallationTest
应当输出:
Executing foamInstallationTest

Basic setup :
-------------------------------------------------------------------------------
...

Summary
-------------------------------------------------------------------------------
Base configuration ok.
Critical systems ok.

Done
运行演示算例:
mkdir -p $FOAM_RUN
run  # 即 cd $FOAM_RUN
cp -r $FOAM_TUTORIALS/incompressible/simpleFoam/pitzDaily ./
cd pitzDaily
blockMesh   # 生成网格
simpleFoam  # 运行求解器
touch result.foam  # 用 ParaView 查看结果
openfoam.org演示算例:Supersonic flow over a forward-facing step
⚠️ OpenFOAM 的并行,在算法层面基于区域分解,在软件层面基于消息传递:
4 个物理核心 (physical cores),利用超线程 (hyperthreading) 技术最多可以同时运行 8 个线程。在 1 台机器上运行 4 个进程:
cp -r $FOAM_TUTORIALS/compressible/sonicFoam/laminar/forwardStep forwardStep_1x4
cd forwardStep_1x4
vim system/decomposeParDict
设置分块参数:
/* system/decomposeParDict */
FoamFile {
    version     2.0;
    format      ascii;
    class       dictionary;
    object      decomposeParDict;
}
numberOfSubdomains 4;
method          simple;
coeffs {
    n           (2 2 1);
}
其中 n (2 2 1); 表示沿 X-轴分为 2 块、沿 Y-轴分为 2 块、沿 Z-轴分为 1 块。详见《method》。
decomposePar # 每 1,000,000 单元 大约需要 1 GB 内存。
mpiexec -n 4 sonicFoam -parallel
paraFoam -builtin
reconstructParMesh  # 仅用于可变网格
reconstructPar
paraFoam -touch  # Create the file (eg, .blockMesh, .OpenFOAM, .foam, ...)
其中 reconstructPar 默认重构所有时间步(可能较慢),以下选项可以节省时间:
-latestTime】只处理最后一步-time N】只处理时刻 N-newTimes】只处理新增的时间步touch processorK.OpenFOAM
paraFoam processorK.OpenFOAM
在 2 台机器上分别运行 20 个进程,基本流程与单机版本类似:
cp -r $FOAM_TUTORIALS/compressible/sonicFoam/laminar/forwardStep forwardStep_2x20
cd forwardStep_2x20
vim system/decomposeDict
/* system/decomposeParDict */
FoamFile {
    version     2.0;
    format      ascii;
    class       dictionary;
    object      decomposeParDict;
}
numberOfSubdomains 40;
method          simple;
coeffs {
    n           (10 4 1);
}
但需指定各台主机可以分担的进程数量:
echo "host1:20"  > hostlist
echo "host2:20" >> hostlist
mpiexec -n 40 -f hostlist sonicFoam -parallel
reconstructPar
touch result.foam
decomposeParDict位于 system 中的 decomposeParDict 文件描述分块方案,基本格式如下:
FoamFile {
    version     2.0;
    format      ascii;
    class       dictionary;
    object      decomposeParDict;
}
numberOfSubdomains 40;
method  /* simple | hierarchical | scotch | metis | manual 五选一 */;
coeffs { /* 具体内容取决于 method */ }
simple依次沿 X、Y、Z 方向分割。
coeffs {
  n           (10 4 1);  // #subdomains in X, Y, Z
  delta           1e-3;  // (optional) cell skew factor
}
hierarchical与 simple 类似,但需给出分割的顺序。
coeffs {
  n           (10 4 1);  // #subdomains in X, Y, Z
  delta           1e-3;  // (optional) cell skew factor
  order            xyz;  // or xzy | yxz | yzx | zxy | zyx
}
scotch【推荐】自动分块。
coeffs {
  processorWeights (1 2 3);  // (optional) 各处理器的权重因子
  strategy               b;  // (optional)
}
⚠️ 使用此方法需安装有 libscotch.so,OpenFOAM 提供了安装脚本,具体过程如下:
foam
git clone https://develop.openfoam.com/Development/ThirdParty-common.git ThirdParty
cd ThirdParty
git clone https://gitlab.inria.fr/scotch/scotch.git $SCOTCH_VERSION
source $WM_PROJECT_DIR/etc/bashrc WM_MPLIB=USERMPI WM_PROJECT_USER_DIR=$WM_PROJECT_DIR/../$WM_PROJECT_VERSION
./Allwmake -j -s -q -l
metis用 METIS 自动分块。
manual用户显式地为各个单元分配处理器。
coeffs {
  dataFile "FileName";  // (optional) 描述单元与处理器对应关系的文件
}
polyMesh 格式OpenFOAM 所使用的网格,由位于 constant/polyMesh 中的一组文件来描述:
points】共 nPoints 项,第 i 项形如 (3.2 1.5 0.05),表示第 i 号 Point 的坐标。faces】共 nFaces 项,第 i 项形如 4(21 53 604 25),表示第 i 号 Face 所含 Points 的数量及编号。owner】共 nFaces 项,第 i 项为某个 Cell 的编号,它是第 i 号 Face 的所有者 (owner)。neighbour】共 nInternalFaces 项,第 i 项为某个 Cell 的编号,它是第 i 号 InternalFace 的邻居 (neighbour),即与 owner 相对的另一侧 Cell。boundary】共 nPatches 项,第 i 项形如 movingWall { type patch; nFaces 20; startFace 761; },表示第 i 号 Patch 的 movingWall;patch(还可以是 symmetryPlane、empty、wedge、cyclic、wall、processor 之一);Faces 的数量,此处为 20;Face 的编号,此处为 761(其后 Faces 的编号依次为 762, 763, ..., 780)。blockMesh只适用于简单几何外形。
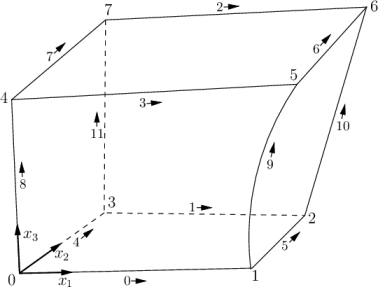
FoamFile {
  version     2.0;
  format      ascii;
  class       dictionary;
  object      blockMeshDict;
}
// * * * * * * * * * * * * * * * * * * * * * * * * * * * * * * * * * * * * * //

scale   0.001;  // scales to mm (0.001 m)

vertices
(
  ( 0    0    0  )    // vertex number 0
  ( 1    0    0.1)    // vertex number 1
  ( 1.1  1    0.1)    // vertex number 2
  ( 0    1    0.1)    // vertex number 3
  (-0.1 -0.1  1  )    // vertex number 4
  ( 1.3  0    1.2)    // vertex number 5
  ( 1.4  1.1  1.3)    // vertex number 6
  ( 0    1    1.1)    // vertex number 7
);

edges // (optional) interpolation point(s) for curved edges
(
  arc 1 5 (1.1 0.0 0.5)
);

blocks
(
  hex (0 1 2 3 4 5 6 7)    // vertex numbers
  (10 10 10)               // numbers of cells in each direction
  simpleGrading (1 2 3)    // cell expansion ratios, width(end) / width(start)
);

boundary
(
  inlet            // patch name
  {
    type patch;    // patch type for patch 0
    faces
    (
      (0 4 7 3)    // block face in this patch
    );
  }                // end of 0th patch definition
  outlet
  {
    type patch;
    faces
    (
      (1 2 6 5)
    );
  }
  walls
  {
    type wall;
    faces
    (
      (0 1 5 4)
      (0 3 2 1)
      (3 7 6 2)
      (4 5 6 7)
    );
  }
/*
  defaultFaces
  {
    type empty;
    faces
    (
      any face omitted from the boundary list
    );
  }
 */
);

mergePatchPairs
(
);

// ************************************************************************* //
snappyHexMesh适用于复杂几何外形的网格自动生成工具。
constant/triSurface 的 STL (stereolithography) 文件表示。system/snappyHexMeshDict 文件描述。snappyHexMeshDictcastellatedMesh true; // or false
snap true; // or false
addLayers true; // or false
geometry {
// 几何外形
}
castellatedMeshControls {
// 网格细化
}
snapControls {
// 网格捕捉
}
addLayersControls {
// 边界层网格
}
meshQualityControls {
// 网格质量
}
geometrygeometry {
wolfExtruded.stl/* STL file name */ {
type triSurfaceMesh;
name wolf;
regions/* (optional) for STL file with multiple patches */ {
wolflocal/* patch name in STL file */ {
name wolf_wall/* patch name in SnappyHexMesh */;
}
}
}
box {
type searchableBox;
min (-100.0 -120.0 -50.0);
max (+100.0 +120.0 +150.0);
}
sphere {
type searchableSphere;
centre (+120.0 -100.0 +50.0);
radius 40.0;
}
}
castellatedMeshControlscastellatedMeshControls {
/* refinement parameters */
maxLocalCells 100000;
maxGlobalCells 2000000;
minRefinementCells 0;
maxLoadUnbalance 0.1;
nCellsBetweenLevels 1;
resolveFeatureAngle 30/* 若相邻面元的夹角大于此值,则细化之 */;
planarAngle 30;
allowFreeStandingZoneFaces true;
features /* explicit feature edge refinement */ {
{
file "wolfExtruded.eMesh"/* 由 surfaceFeatureExtract 生成 */;
level 2;
}
}
refinementSurfaces /* surface-based refinement */ {
wolf/* 在 geometry 中定义 */ {
level (1 1)/* 全局细化 */;
regions {
wolflocal/* 在 geometry 中定义 */ {
level (2 4)/* 局部细化 */;
patchInfo {
type wall/* or `patch` */;
}
}
}
}
sphere/* 在 geometry 中定义 */ {
level (1 1);
faceZone face_inner;
cellZone cell_inner;
cellZoneInside inside;
faceType internal/* or baffle | boundary */;
}
}
refinementRegions /* region-wise refinement */ {
box/* 在 geometry 中定义 */ {
mode inside;
levels ((1 1));
}
}
locationInMesh(-100.0 0.0 50.0/* in_solid_body ? internal_mesh : external_mesh */);
}
snapControlsaddLayersControlsmeshQualityControlscfMesh 模块cartesianMesh # predominantly hexahedral cells
tetMesh # only tetrahedral cells
pMesh # arbitrary polyhedral cells
generateBoundaryLayers
meshDict/* cfMesh requires only two mandatory settings: */
surfaceFile "surfaceMeshes/surf.fms"; // path to the geometry file
maxCellSize 0.1; // default cell size (metres)
/* (optional) global refinement settings: */
boundaryCellSize 0.001;
boundaryCellSizeRefinementThickness 0.1; // thickness of the refinement region away from the surface
minCellSize 0.01;
localRefinement/* (optional) boundary refinement settings: */
localRefinement {
"patch15.*"/* patch name, could be regex */ {
cellSize 0.02; // (or) additionalRefinementLevels 2;
refinementThickness 0.2;
}
subset1 {
cellSize 0.05;
}
}
objectRefinements/* (optional) refinement in primitive geometric objects: */
objectRefinements {
boxExample/* object name */ {
type box/* (or) line, sphere, cone, hollowCone */;
cellSize 0.02; // (or) additionalRefinementLevels 2;
centre (3.0, 4.0, 5.0);
lengthX 10.0; lengthY 10.0; lengthZ 10.0;
refinementThickness 0.1; // optional
}
}
boundaryLayers/* settings for boundary layers */
boundaryLayers {
nLayers 10; // (optional) 0 or 1 by default
thicknessRatio 1.2; // (optional) 1 by default
maxFirstLayerThickness 0.02; // (optional)
/* local settings for individual patches */
patchBoundaryLayers {
"patch20.*"/* patch name, could be regex */ {
nLayers 20;
thicknessRatio 1.2;
maxFirstLayerThickness 0.01;
allowDiscontinuity 0/* #layers for this patch shall NOT spread to other patches in the same layer */;
}
}
}